Time tracking is a core feature of Cloud Coach that provides simple, fast data entry so users spend less time punching in numbers and more time managing their projects. The two primary features of time tracking—Time Entry Widget and the Timecard—remove the headache from time entry, but their capabilities extend beyond just entering and viewing time. When combined with an approval process, you can guarantee that your team’s time entries are routed to the right people and given the proper visibility.
So let’s talk about the different approval processes we can leverage here.
Timecard Approval
Beginning at the top level, we’re going to take a look at how to setup a quick approval process on a user’s timecard, so we can send the week’s time entries out in one go. This is a two-step process that consists of setting up an approval process on the Timesheet object, and then turning on a custom setting to display the “Submit for Approval” action on a user’s timecard.
Step One: Setting up the Approval Process
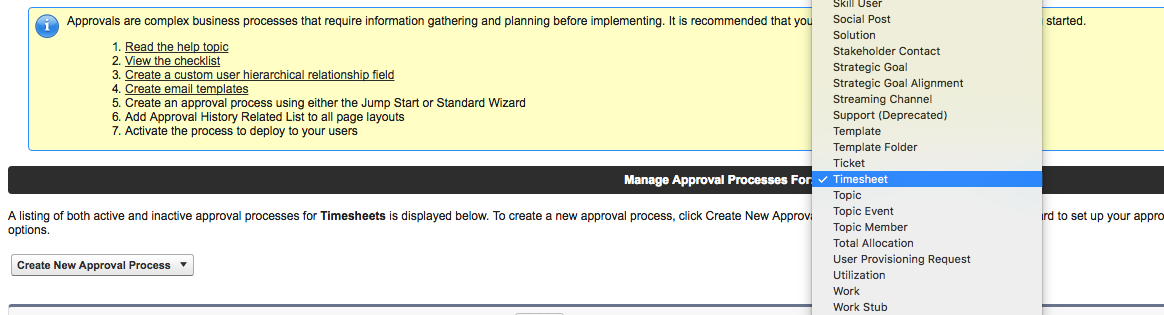
Let’s begin by navigating to Setup -> Create -> Workflows & Approvals and clicking on Approval Processes. Once there, select “Timesheet” as the object for approval, then click Create New Approval Process:
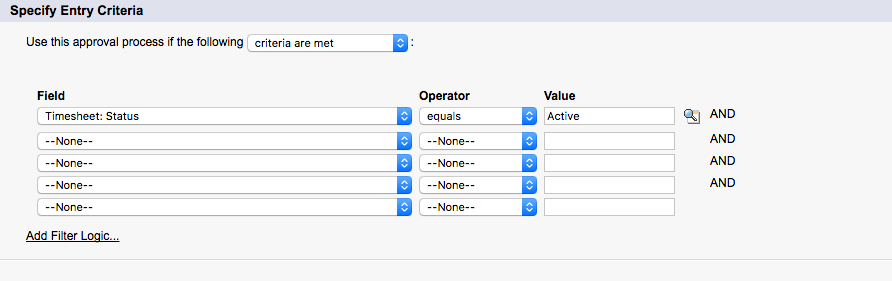
Since we only want to send Timesheets with entered time through the approval process, choose Timesheet Status: Active as the Entry criteria:
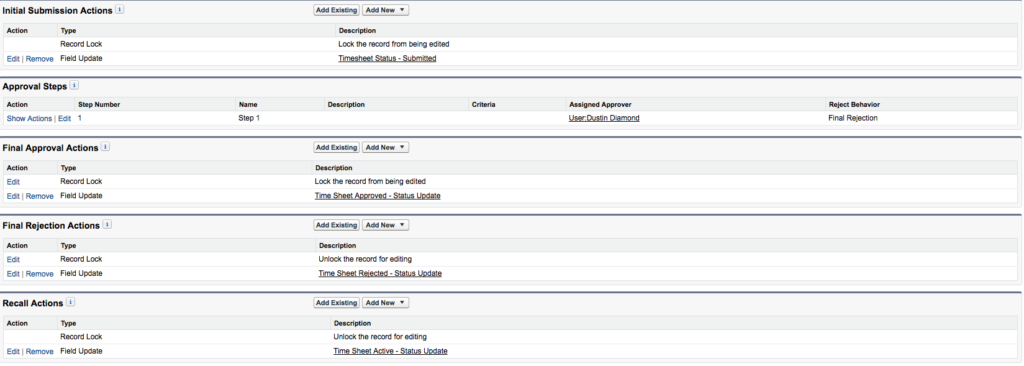
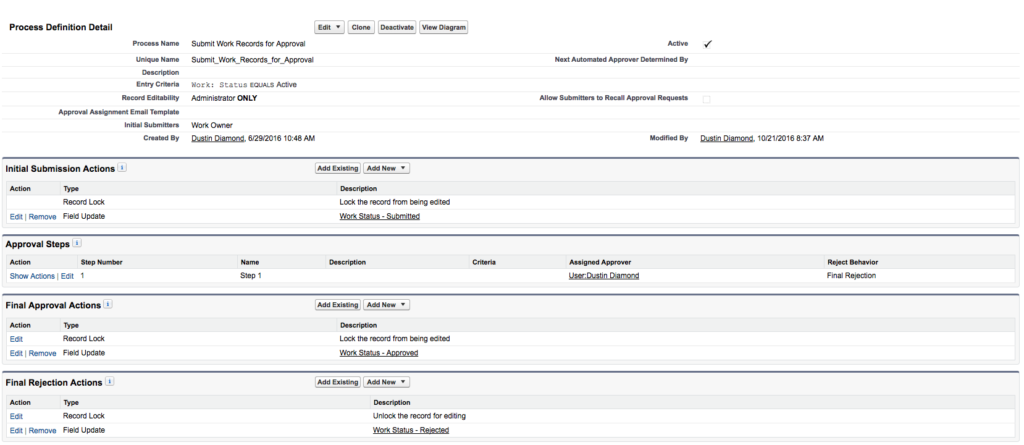
Select which users—or queues—can approve the timesheet, as well as which fields you would like displayed on the approval page, and then click Save. Now we can choose how many steps we’d like in our approval process, as well as any field updates when the timesheet is either approved or rejected. Our choices here are going to depend heavily on our business practices, but a basic layout should look something like this:
Notice that we chose to lock the record once the Timesheet has been sent, and keep it locked once it has been approved. The only time it becomes unlocked is if it is rejected (because something needs fixing before we resubmit), or because it’s recalled. Now we just need to set the approval process as Active, and then move to step two.
Step Two: Turn on Custom Setting
An approval process by itself isn’t going to do anything without the ability for users to actually choose to submit the record for approval. Since “Timecard” is a Visualforce page, it’s not as simple as adding a button or a related list in a page layout. But Cloud Coach has an answer for that.
Navigate to Setup -> Develop -> Custom Settings, and select Manage on “Time Options”:
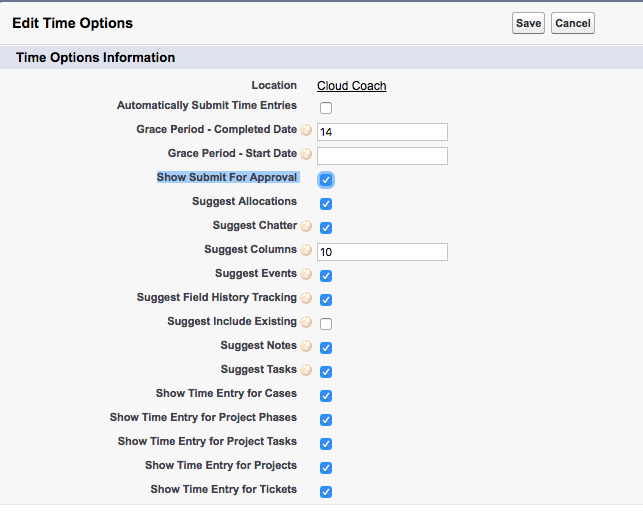
Next, we’ll click Edit and go into the Time Options page, which allows us to check the “Show Submit for Approval” option:
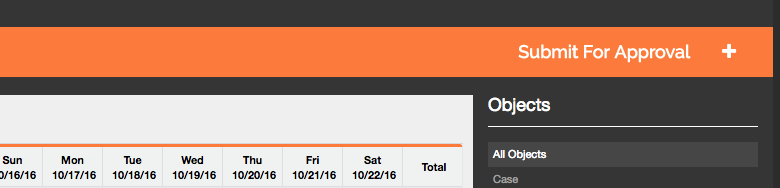
And now when we go to our Timecard we see “Submit for Approval” in the top right corner:
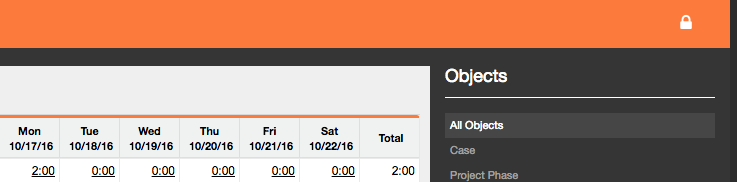
Time to test our process. Click the Submit for Approval button on that Timecard and we should see a “Success” message at the bottom of the page, followed by a locked symbol where the Submit button used to reside:
Now we know that our Timecard approval process has worked, and we’re ready to look at the second kind of approval process.
Time Entry Approval Process
So let’s say that we want to send time for approval as we enter it, rather than submitting an entire timecard; with the process we’ve built so far we have to send the entire timecard at once. That’s great if the work we’ve done only needs a single approver, but what if we’ve worked on a project for one department on Monday, and a different department on Tuesday? The work on Monday needs to go to one approver, and the work on Tuesday needs to go to another. We need a way to submit each time entry for approval rather than sending out the entire timecard.
There are two ways we can tackle single time entry approval—the first is as simple as turning on a custom setting, and the second utilizes a process and custom field.
Step One: Create Approval Process
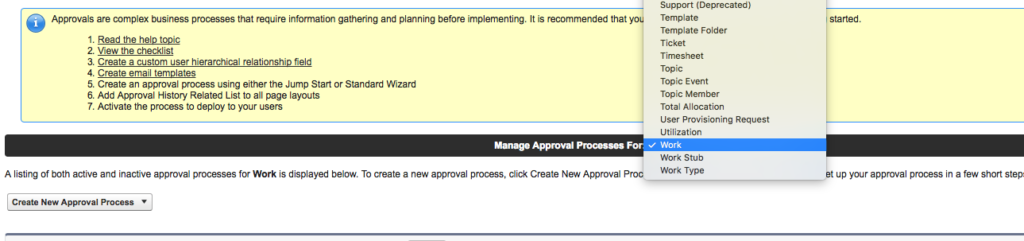
Both time entry approval options require an approval process, so let’s start by navigating to Setup -> Create -> Workflows & Approvals and select Approval Processes. This time, instead of selecting Timesheet we’ll choose Work (the object that drives time entry):
Select Create New Approval Process and make an approval similar to what we did earlier with Timesheet:
Now we’re ready to move on to option A and turn on a custom setting.
Step Two (Option A): Turn on Custom Setting
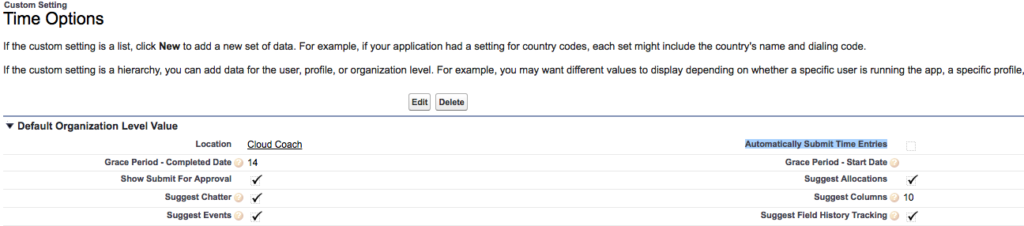
Let’s go back to custom settings by navigating to Setup -> Develop -> Custom Settings and click Manage on “Time Options.” In that page we can click on the “Automatically Submit Time Entries” option:
Once selected, every time we enter time it will submit that entry to the approval process we just created. The benefit of this option is that it takes the thinking out of the process and allows users to just enter time and move on to the next part of their day. The disadvantage is that it send every time entry to that approval process, which might be overkill for our business. What if we only want time entered on a certain project or task to go to our approval process?
For that, we’re going to pursue option B and create a custom field and some simple automation in Process Builder.
Step Two (Option B): Create a Custom Field
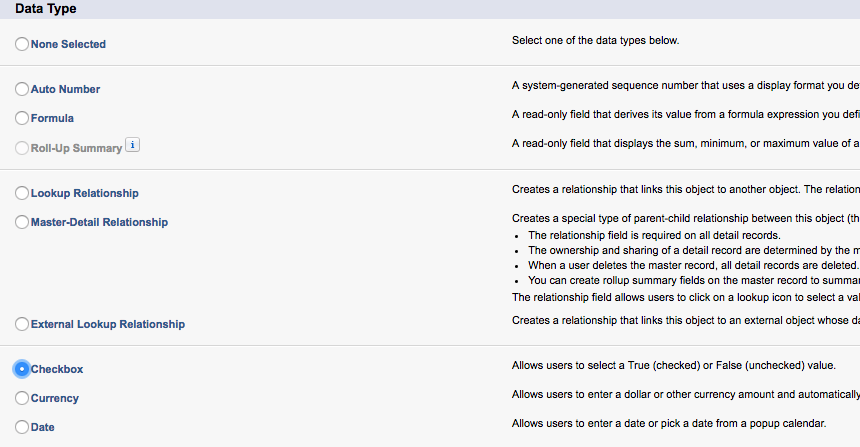
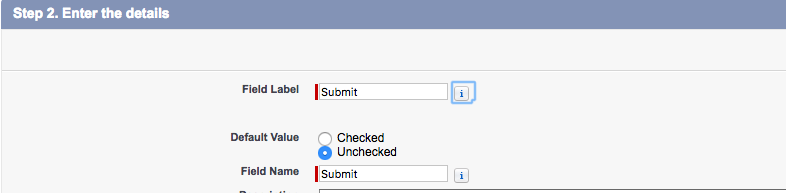
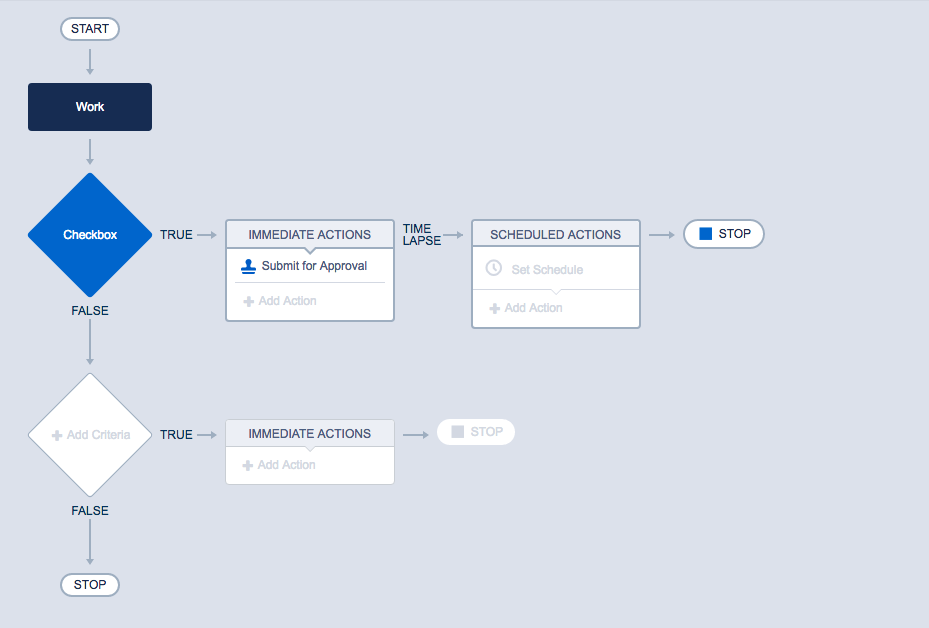
Go to Setup -> Create -> Objects -> Work and select New under Custom Fields. In the creation screen choose Checkbox, and label it Submit:
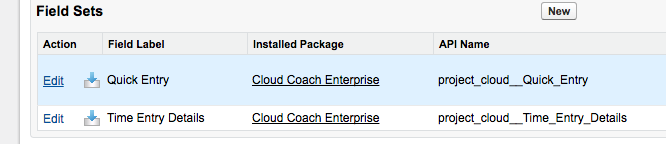
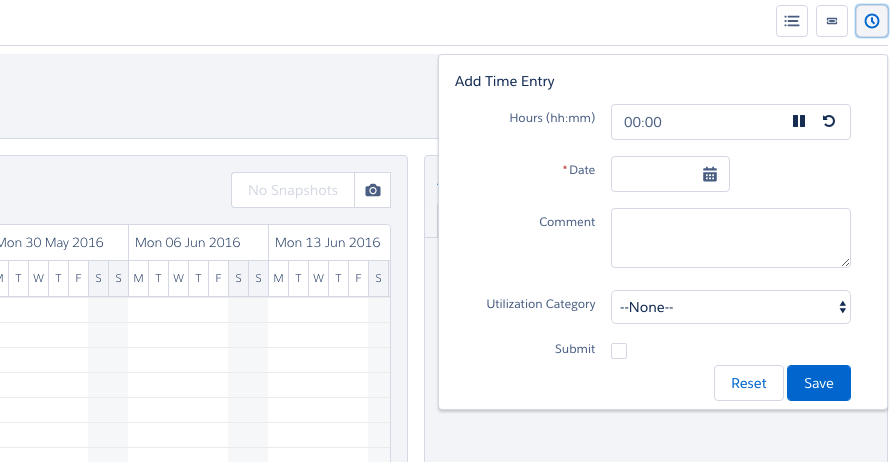
Next, add our new checkbox to the Work field set for Quick Entry. This way it will show up on all the Time Quick Entry Widgets when users enter their work:
Now, when we enter time on any of the Quick Entry Widgets we can clearly see the option to select Submit:
That Submit button is just a checkbox at the moment, however. We still need a process that utilizes that criteria to launch the approval process.
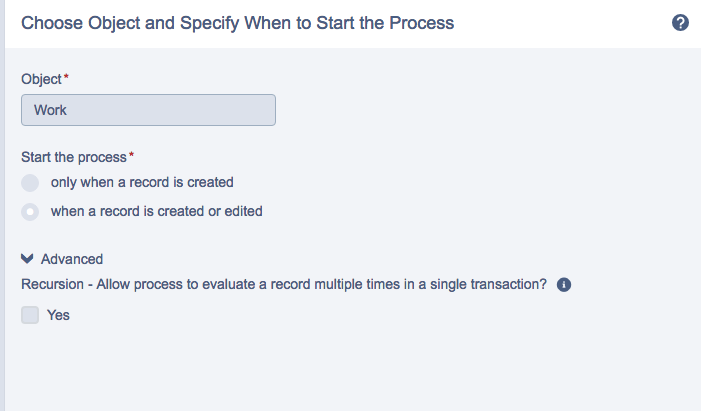
So let’s go into Process Builder and create a new Process called “Submit Time Entry” with the starting object set as Work:
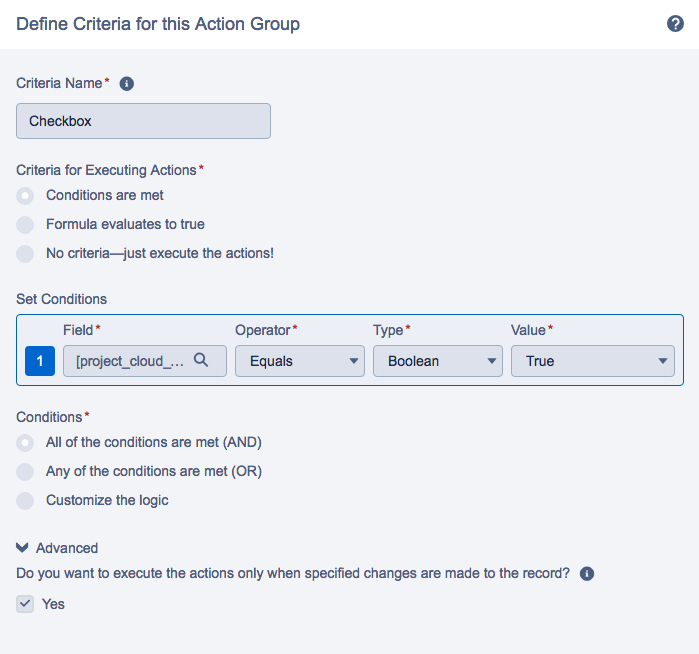
For criteria we’ll select our new Submit button and choose to launch the process when it is checked:
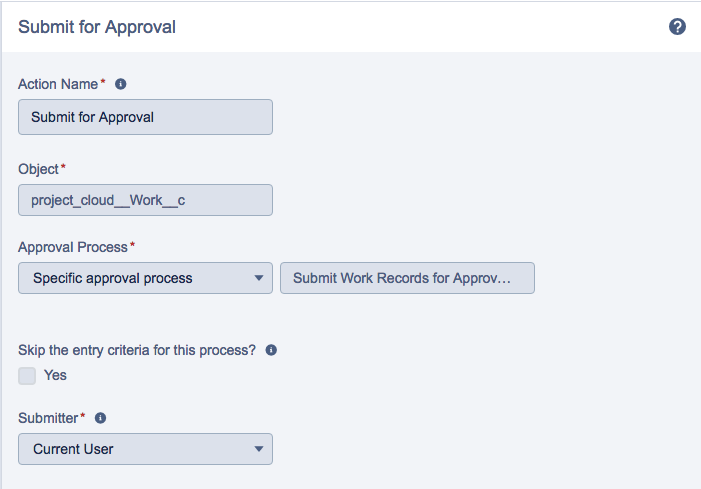
Finally, for our action let’s choose Submit For Approval and point to our Work approval process:
When we’re finished we activate our process and we’re ready to go. The finished product should look something like this:
Conclusion
And that’s it! Now you have a process that allows users to choose when they want submit their time entries for approval, as well as a way to send them automatically. And if they want to wait and send their entire timecard at the end of the week, they have that option too.
It’s just that easy.
AUTHOR
Nic Widhalm
Nic is the Global VP, Customer Experience, at Cloud Coach
https://youtu.be/kLAgMbqBGxo This week the Cloud Coach team discusses the three ways you can quickly capture time, including using Salesforce Chatter....
A Cloud Coach advisor will be in contact by email within one working day to arrange your demo.
We use necessary cookies to ensure our site functions properly. Additionally, we'd like to set analytics cookies to help us improve your experience by measuring site usage. For more details on the cookies we use, please visit our Privacy Policy page.
This website uses cookies to improve your experience while you navigate through the website. Out of these cookies, the cookies that are categorized as necessary are stored on your browser as they are essential for the working of basic functionalities of the website. We also use third-party cookies that help us analyze and understand how you use this website. These cookies will be stored in your browser only with your consent. You also have the option to opt-out of these cookies. But opting out of some of these cookies may have an effect on your browsing experience.