CHAPTER 1
1. Cloud Coach: Customer Project Management
Stakeholders from your team
Work how you want with multiple project methodologies
Cloud Coach is a Customer Project Management solution, built natively on the Salesforce platform designed to help you deliver maximum value to your customers and stakeholders by giving you choice in how to run your projects.
One of the most noticeable ways that Cloud Coach helps you in this, is via our unique ability letting you select the best approach for every project from one of three different project methodologies (Waterfall, Agile and Water-Scrum-Fall).
The 2 minute video below shows and explains key capabilities of each of these methodologies:
All of the project methodologies mentioned in the video are available to all users of all four tiers of Cloud Coach, which includes your Cloud Coach Starter Tier. (More information about the Cloud Coach tiers can be found in chapter 9).
Of course Cloud Coach Starter does much more than just let you manage your project timelines, you can also manage your resource assignments, project cases, and track time on projects or any other Salesforce record, which we will go into in more detail later.
Resources To Help You Be Successful
Cloud Coach Academy
https://academy.cloudcoach.com/
Learn at your own pace with your online academy covering all aspects of how Cloud Coach from administration, through project management and end user time management.
Cloud Coach Open Office Hours
Join one of our daily open office hours and talk to the Cloud Coach team about how best to set the solution up for your team. Learn about best practices and ask your own questions.
CHAPTER 2
2. Steps for a Successful Self-Implementation
Stakeholders from your team
When you go to the trouble of downloading a tool from the AppExchange, you will deliver more value if you set the tool up the right way for your users. With Cloud Coach the steps that we advise you to complete to see the most success from your deployment are:
Install the main Cloud Coach Package
Install the Cloud Coach – Salesforce Connector Package
Go to ‘Cloud Coach Admin’ tab and assign to your ‘Users’ Cloud Coach access
Add ‘Work Types’ in Resourcing Tab
Create Your First Project
Get to know the ‘Projects’ tab
Get to know My Day & Time Tracking
Reporting & Dashboards
Understand the ‘Four Cloud Coach Tiers’
Fundamentals to Starter Migration (optional)
CHAPTER 3
3. Installing Cloud Coach Packages
Stakeholders from your team
To get the optimal experience of Cloud Coach requires you to download two packages:
Cloud Coach Starter
The first package that you need to download is the main Cloud Coach package which contains everything you need to run great projects of all kinds. The latest version of Cloud Coach is maintained on the AppExchange listing below and can be downloaded any time.
https://appexchange.salesforce.com/appxListingDetail?listingId=a0N4V00000GYYlxUAH
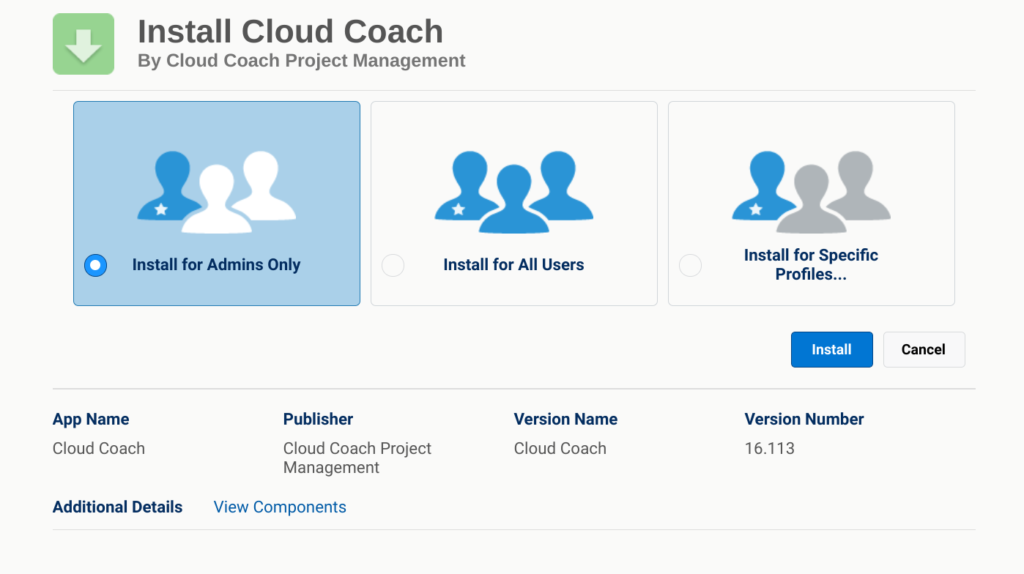
When downloading Cloud Coach we strongly recommend that you install the package for Admins only as per the screenshot below (we will cover how to assign users Cloud Coach permission in the Cloud Coach admin section later).
Cloud Coach & Salesforce Connector
Once you have successfully downloaded the Cloud Coach package, we highly recommend downloading our Cloud Coach and Salesforce Connector package which will add lookups from Cloud Coach Projects to all your popular CRM objects like ‘Accounts’ and ‘Opportunities’. The latest version of the connector package can be found at the link below.
https://appexchange.salesforce.com/appxListingDetail?listingId=a0N3000000B4QuzEAF
You might ask why we didn’t include all those links in the Cloud Coach package, the answer to that is it gives advanced users a few possibilities in different ways or sharing project data that wouldn’t be possible if it was all in one package.
CHAPTER 4
4. Cloud Coach Administration
Stakeholders from your team
Cloud Coach admin tab
Cloud Coach Admin is the area where you can tailor Cloud Coach to your business needs. There are currently five tabs / areas with each described in more detail following a short overview video of this area:
Tab / Area | What is it? |
Getting Started | For those who have missed this Self Implementation Guide, the ‘Getting Started’ area contains links to our Academy, along with this implementation guide! |
Permissions & Users | This is the area where you can assign Cloud Coach access to your team. By assigning a user here, they get both the user subscription to Cloud Coach assigned to them, along with the necessary permission sets to allow them to start working within Cloud Coach immediately. |
User Interface | The first option under ‘User Interface’ is ‘Field Sets’. Cloud Coach uses field sets extensively against many objects to allow you as admins to configure among other items the columns displayed in tables, along with the fields displayed and the order they are displayed in our side panel. This allows you to bring your own custom fields into the Cloud Coach UI. (Custom fields are added to the objects in the same way you would on any object in Salesforce). The second option under ‘User Interface’ is ‘Color Tags’. Color Tags are used within the Timelines area of Cloud Coach on both waterfall ‘Project Tasks’ and agile kanban ‘Cards’ to differentiate them by color. While Color Tags can be configured on individual projects, by defining tag sets here that are to be used across a group of projects you can drive consistency across your business, with all marketing projects having the same marketing labels and all development projects having development labels. |
Processes | The Processes Tab ensures that you have the Kanban Board Project processes built and ready to use when needed by your team to create a Project. Board Processes allow for standardization across projects so your team is always following your best practice processes. Cloud Coach comes pre-packaged with many popular board processes for departments across your business. You can use them as is, modify them, or create your own new kanban board processes. |
Data | Finally the ‘Data’ tab in Cloud Coach Admin lets you move data such as project templates, or board processes from your Sandboxes to Production environments in a quick and easy manner. |
To learn more about the Cloud Coach Admin tab, please visit https://academy.cloudcoach.com/lessons/cloud-coach-admin/
CHAPTER 5
5. Resource Management
Stakeholders from your team
Resourcing Options with Cloud Coach Tiers
Resource Management capabilities vary with each tier in Cloud Coach. As you progress through the tiers of Cloud Coach, additional resource management functionality is enabled for your users at each level, as summarized in the table below:
|
|
| |
Quick Assign | Quick Assign | Quick Assign | Quick Assign |
Time Assignments | Time Assignments | Time Assignments | |
Multi Level Skills | Multi Level Skills | ||
FTE Scenario Planning |
Quick Assign
Within Cloud Coach Starter the resource management method available to you is ‘Quick Assign’ which allows you to quickly tag one or more of your Cloud Coach users against each task or card. Removing users is just as easy, simply ‘x’ the person you want to remove from the task or card.
In Waterfall and Water-Scrum-Fall Projects you can also mass add and remove users based on criteria like task start date or work type in the ‘Resources’ area of the Projects App.
Work Types
Work Types allow you to tag Project Tasks as needing a specific skill to perform the Project Task. Work Types are configurable by your organization and are set up and managed in the ‘Resourcing’ tab under the ‘Work Types’ area. (Note only ‘Skills’ work types are relevant to Cloud Coach Starter tier, location work types are used in Cloud Coach Enterprise and are not relevant to Cloud Coach Starter)
Finally to learn more about Cloud Coach Resource Management, please visit:
CHAPTER 6
6. Creating Your First Project
Stakeholders from your team
Project Creation Wizard
Project creation occurs in the ‘Projects’ tab and can be initiated either by clicking on the create new in the lightning tab, or by clicking the new project button in the top right of the screen once you have loaded the projects tab.
Here is a quick video showing how to create a new project in Cloud Coach:
As demonstrated in the video, you can create projects from new or from a template in any of the three project methodologies shown in the table below.
What is it? | When to use it? | |
Waterfall | A methodology where projects are completed in a step-by-step fashion, building towards an ultimate deliverable. | When a user needs to deliver projects in a staged, ordered fashion and tasks need to be dependent on dates or predecessor tasks. |
Agile (Kanban) | An iterative method of project delivery. | When a quick starting deliverable is needed and your team can then get feedback from stakeholders and iterate through the sprints to a final deliverable. |
Water-Scrum-Fall | A hybrid methodology between waterfall and kanban. Where a waterfall project progresses in a linear fashion, an agile process can be embedded in a task to allow for sprints/iterations to drive toward the completion of a task. | When a waterfall project works as the primary methodology, but during that project, iterations are needed. Eg – during a customer onboarding, there is a configuration phase that can benefit from an agile/iterative process. |
Linking Projects To Salesforce Records
While you can create stand-alone projects, one of the most popular ways to create projects is from your existing Salesforce records such as accounts, opportunities or cases. To do this simply add the Cloud Coach project related list to your page layouts. You can learn more about how to do this here: https://academy.cloudcoach.com/courses/creating-a-project/
Automating Project Creation
To save your team time and ensure your team is using the right project template for the initiative at hand you can also automate your project creation using process builder or flows. Popular examples here are creating an onboarding project when an opportunity is won, or a case review meeting when a case is escalated. You can learn more about how to automate project creation here:
https://academy.cloudcoach.com/courses/initiation-automation/
CHAPTER 7
7. Projects Tab
Stakeholders from your team
The ‘Projects’ tab in Cloud Coach is where all the action happens, from here you can:
- Create new projects
- See performance across all your projects, with multi project views in Gantt. Table View or Health format.
- Drill down into individual projects for more information
Cross / Multi Project Views
Cloud Coach comes with some out of the box views (shown below) that let you see a side by side comparison across a range of your projects. In addition to the views below you can also create your own views using Salesforce list views which in Cloud Coach are configured in the same exact way as in Salesforce.
- Recently Viewed
- My Favourite Projects
- Projects I own
- Projects I’m Assigned To
No matter what list you select of projects you get three different ways to visualize and compare your projects
- Gantt View (showing timelines and completion metrics)
- List / Table View (showing any metrics you like)
- Health View (showing health metrics)
Selecting any project row opens up the right hand actions panel which among other items lets you:
- View more project details
- See field history changes
- Chatter on the record
- Track Time on the record
No matter where you are in Cloud Coach you will have access to a right hand action panel whenever you select a record from any object type (project, task, card, case etc).
Finally from the cross project views it’s easy to jump into the details of any project simply by double clicking on the project you want to view, or selecting to view the project from the drop down menu.
Individual Projects
Each Project in Cloud Coach has a number of navigation points (these grow in number as you move up through the Cloud Coach tiers). In Cloud Coach Starter, you have the following navigation points:
- Home (Project details page & Chatter)
- Timelines (Gantt charts, Kanban Boards, Tasks/Cards to complete)
- Controls (Salesforce cases related to the project)
- Resources (Mass assignment of people to tasks)
- Finances (Time entries against the project)
As well as being able to quickly click from area to are of the same project, you can jump from project to project seamlessly using the same list views mentioned above in your left hand side panel.
CHAPTER 8
8. My Day/Time Tracking
Stakeholders from your team
My Day Tab
The ‘My Day’ tab in Cloud Coach gives users one space to view/update everything they’ve been assigned out to and they can even track time in the same space. In My Day you can:
- View the Project Tasks, Cards, Salesforce Tasks, and Salesforce Cases you are responsible for
- Understand priority and due dates
- Drill into each record to get more information
- Enter time as you are working
To Do
Ever feel like you are jumping from screen to screen trying to understand what you are working on or assigned to? In My Day, the To Do tab consolidates the majority of your workload into one section. To Do also gives users flexibility with how they would like to view their workload such as:
- Schedule
- Next 7 Days
- Cards
- Project Tasks
- Tasks
- Cases
Click here for more details on the To Do tab.
Each record you click on within the To Do tab will have an associated side panel ( this will appear on the right hand side of the page). The side panel will allow users to get:
- Top level record information
- Update / edit record information
- Utilize Salesforce chatter
- Enter time
Time
The Time section within the My Day tab allows users to enter time and view an overall summary of what they have entered time on during the week. Users can enter time on Projects, Phases, Tasks, Cards, Salesforce Cases, and even non-project related time entries. Just like with To Do, the Time section gives users options and different views for how they can enter time such as:
- Summary
- Daily Assistant
- Weekly Assistant
- Project Assistant
CHAPTER 9
9. Reporting & Dashboards
Stakeholders from your team
All the data that you capture with Cloud Coach is available to access through the Salesforce reporting engine that you know and love.
Cloud Coach comes with reports and dashboards already packaged that you can use, or you can choose to simply create your own reports and dashboards by leveraging the skill sets you already have. If you choose to create your own reports some of the key objects you will want to reference as as follows:
Object | Description |
Project | Stores top level project information |
Project Phase | Stores the rollup information from the tasks associated with the phase |
Project Task | Stores task completion information for waterfall projects |
Card | Stores card completion and top-level information for agile projects |
Timesheet | Overall summary of the time entered per week. |
Work | Stored individual time entry data |
Allocation | Stores information around user task assignment |
CHAPTER 10
10. The Four Cloud Coach Tiers
Stakeholders from your team
From Starter to Ultimate
At Cloud Coach we recognized that the customer project management needs of different businesses and departments would vary, so we have created four tiers of our award winning solution so that you can find the right level of functionality for your business requirements.
Below is a short explainer video on how the needs a business has from a solution change as the business grows:
Comparison at a glance
| The low risk way for you to get started with Project Management on Salesforce, with your first 10 users always free | Ideal for smaller teams or business looking for a user friendly extensible solution that can grow with your business | Designed for companies looking to profit from deploying best practice processes at scale across their organization | For organizations looking to achieve the best ROI from their capital spend and project initiatives |
| See Pricing | See Pricing | See Pricing | See Pricing |
Starter includes:
| Why Team? All of Starter Tier PLUS:
| Why Enterprise? All of Team Tier PLUS:
| Why Ultimate? All of Enterprise Tier PLUS:
|
CHAPTER 11
11. Fundamentals to Starter Migration
Stakeholders from your team
How did Cloud Coach Starter come about?
From 2016 up until late 2020, Cloud Coach had a second project management tool available on the AppExchange called Cloud Coach Fundamentals which was designed for small to mid-sized businesses. The technology available at the time to us meant that Fundamentals was built in a separate management package with different database objects to our traditional Enterprise solution.
While many people loved the Fundamentals solution, the overwhelming feedback that we received from users was that they would like a simple flick of the switch way of moving from the free version of Cloud Coach to our Enterprise solution, something that wasn’t possible with the separate database structures.
Fortunately advances in technology in recent times have allowed us over the past few months to create a new freemium experience using the same database objects as our core Enterprise product, which was released on August 8th 2021 under the banner Cloud Coach Starter.
Moving from Cloud Coach Starter to any of our paid tiers is now as simple as a flick of the switch in our provisioning solution.
Fundamentals to Starter Data Migration
If you have been previously using Cloud Coach Fundamentals and would like to migrate your project and time tracking data to Cloud Coach Starter then you’re in luck.
We’ve included an automated process to move your data across, which can be accessed from the ‘Data’ section of ‘Cloud Coach Admin’. The table below shows what is and isn’t moved as part of the automation migration.
What is Migrated? | What is NOT Migrated? |
|
|
Should you need any help moving from Cloud Coach Fundamentals to Cloud Coach Starter then please reach out to [email protected].


